Quick start
Screenshots may show the original interface language.
Connect in a few simple steps
Your API.
Your tools.
Connect your favorite application to ZAPRO.SU.
Choose a guide — the settings are ready.
To get started:
Create an account
Sign up at ZAPRO.SU.
Get a code
Through the Telegram bot.
Top up your balance
Use your service wallet.
Create an API key
Select the AUTO group.
You can start with a $5 gift from @neuroshop_markbot.
Where will you use AI?
10 TOOLSCode, files and images
Chats and image generation
The Claude app with your API
An AI agent in your terminal
Claude and Codex in your editor
A coding agent with your API
An agent for files, code and tasks
A personal agent with browser chat
Chatbox for iOS and Android
API for your website, bot and backend
For all applications
Create an API key
One key connects your applications to the ZAPRO.SU API.
- Sign up and top up your balance in your account. You can start with a $5 gift from @neuroshop_markbot.
- Open API Keys, click
Create API Key, enter a name and select theAUTOgroup. - Save and copy the key. Then choose the guide for your application.
Code, files and images
ChatGPT Codex
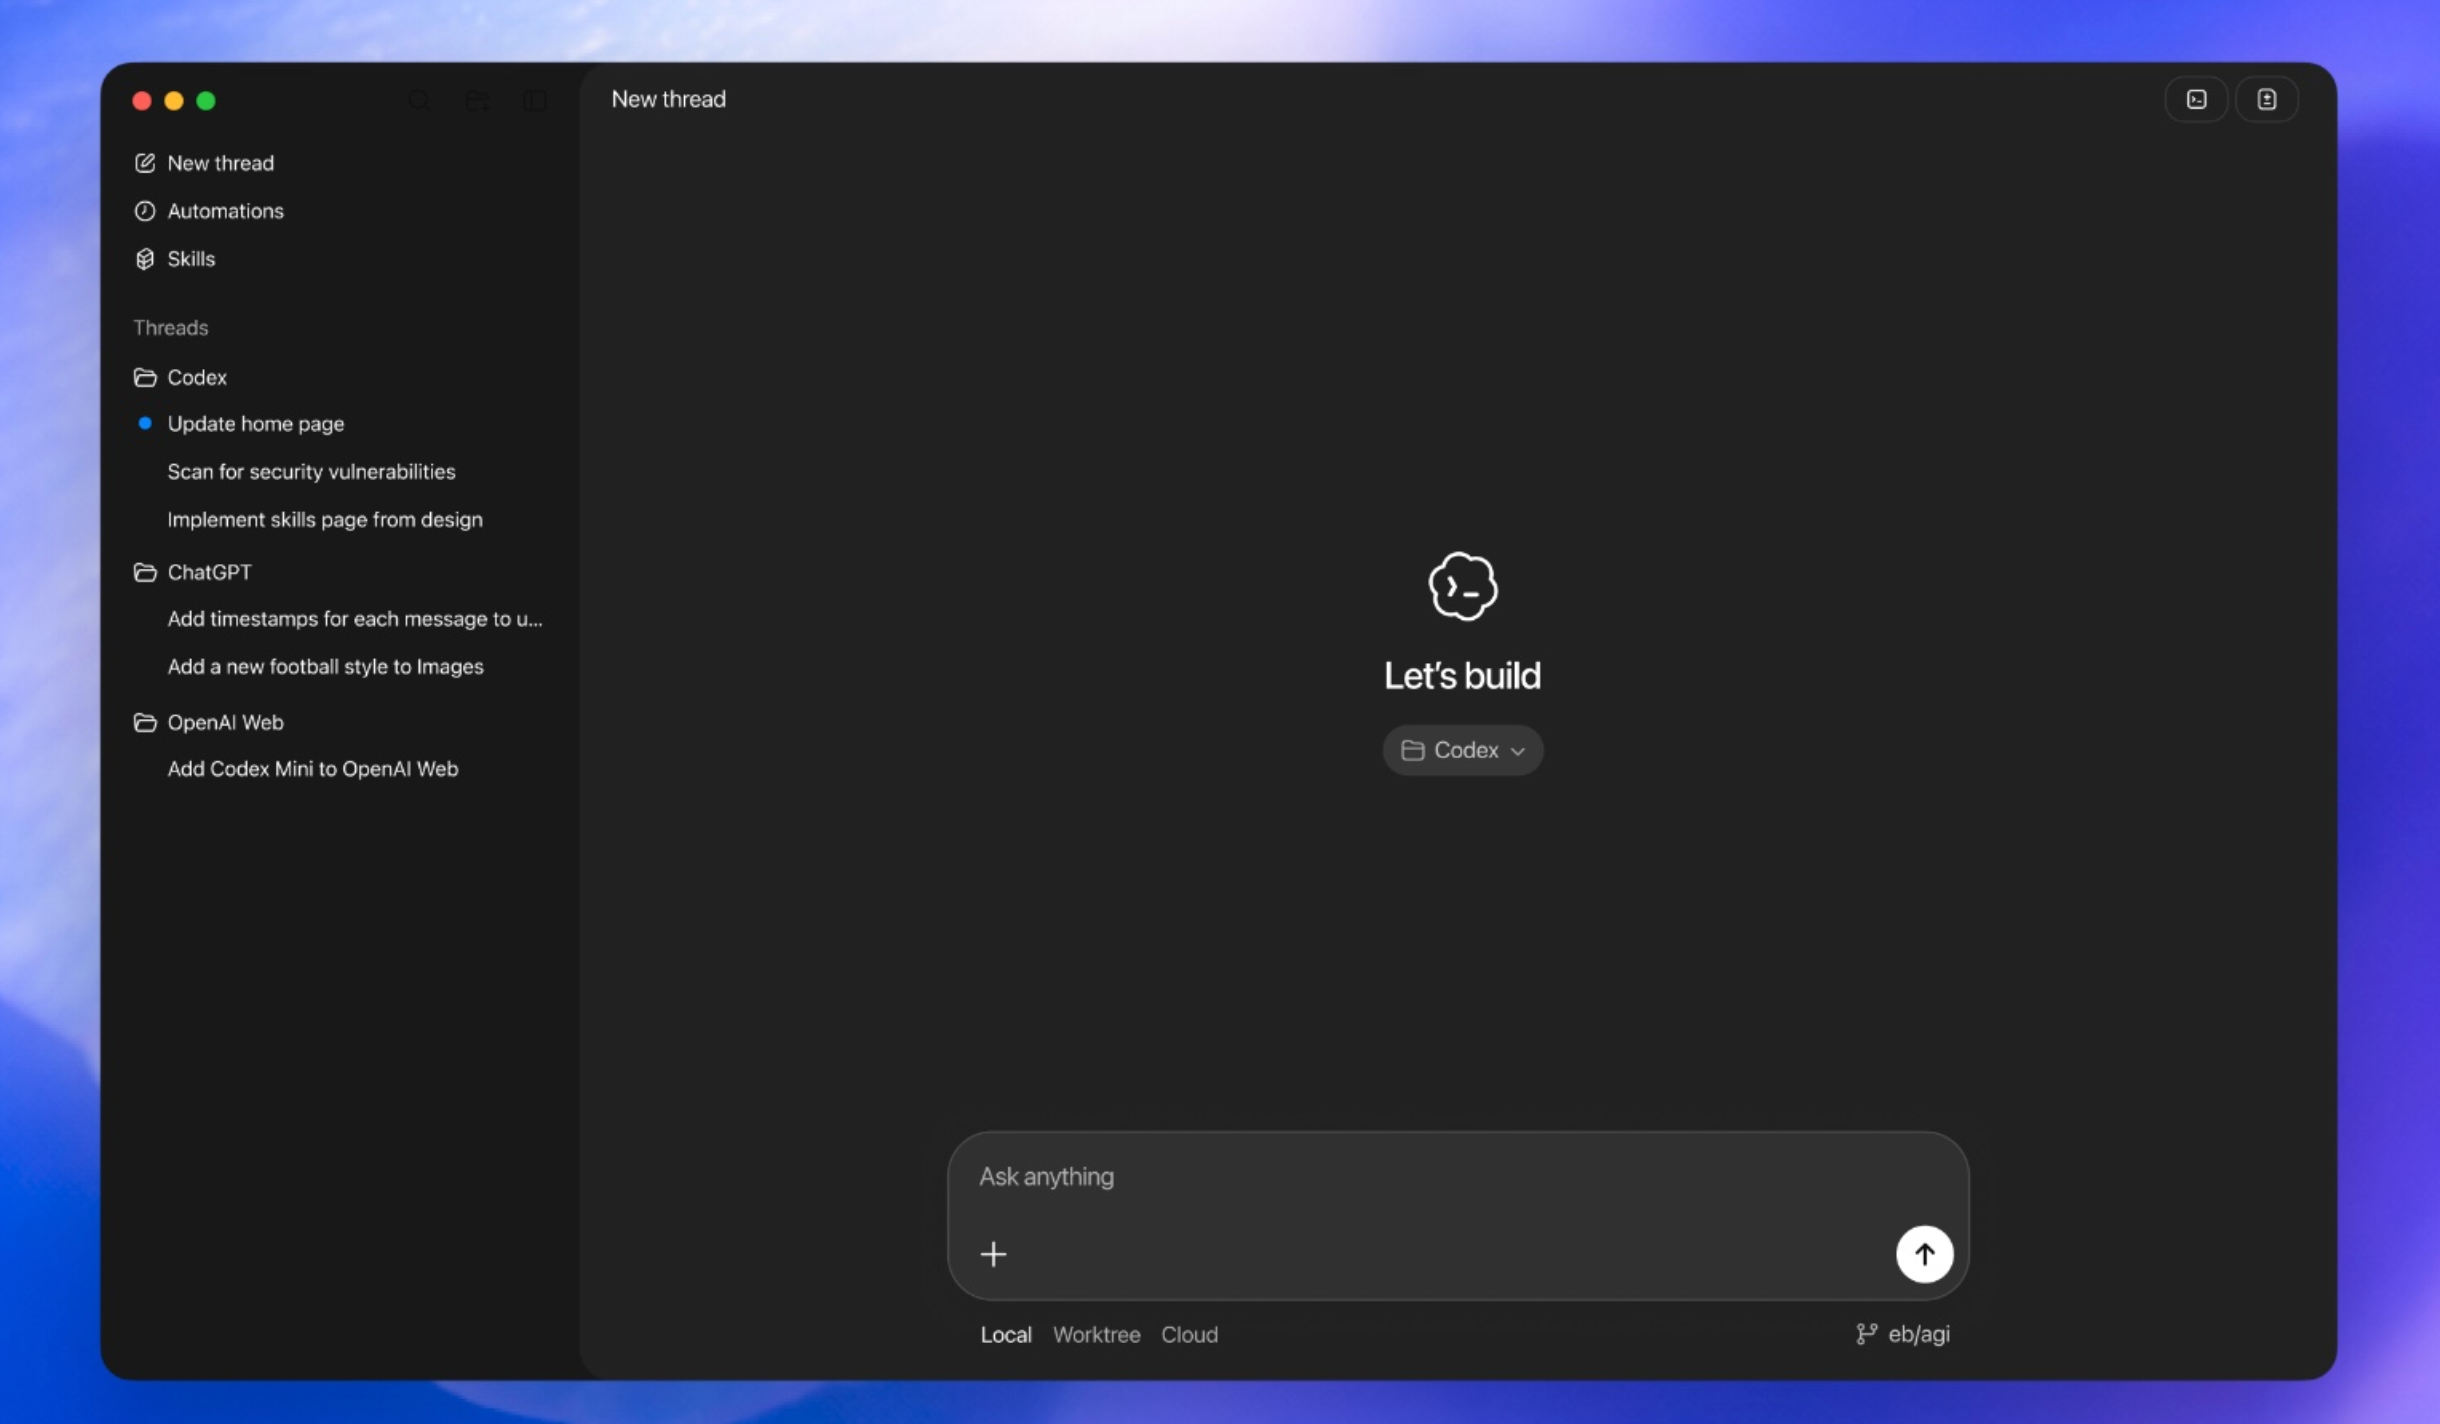
An AI assistant for code, files and images. Choose the setup method that suits you.
Automatic installation
Connect Codex to your API in three steps.
- Sign up, top up your balance and create an API key with the
AUTOgroup. You can start with a $5 gift from @neuroshop_markbot. - Open your system terminal, paste the command and follow the installer prompts.
Windows — open PowerShell from the Start menu.
irm https://zapro.su/codex.ps1 | iexmacOS / Linux — open the Terminal application.
curl -fsSL https://zapro.su/codex.sh | shThe installer connects the API, migrates your history, adds image generation and starts Codex.
- Sign in after launch if prompted. At the top left, click
WorkorChatGPTand selectCodex. If Codex is already selected, start a new chat.
Manual installation
The same API connection, configured through two files: config.toml and auth.json. You need an API key in the AUTO group.
- Install Codex. On Windows/macOS, complete the initial sign-in if prompted, then fully quit the application, including its system tray icon.
Install Codex CLI on Linux
Run this in your system terminal:
curl -fsSL https://chatgpt.com/codex/install.sh | shThen configure the files as described below.
- Open
%USERPROFILE%\.codexon Windows or~/.codexon macOS/Linux. Back up any existingconfig.tomlandauth.jsonfiles. - Open or create
config.tomland add these settings:
model_provider = "zaprosu"
model = "gpt-6-astra"
model_reasoning_effort = "high"
cli_auth_credentials_store = "file"

[model_providers.zaprosu]
name = "ZAPROSU"
base_url = "https://po.zapro.su/v1"
wire_api = "responses"
requires_openai_auth = true
supports_websockets = false
If config.toml is already configured
Keep your other settings. Place the first four lines before the first [...] section, updating any existing values. Add [model_providers.zaprosu] once, or update the existing section. In that section, remove any old env_key, env_key_instructions, experimental_bearer_token, nested auth settings and Authorization header overrides: the key now comes from auth.json. If forced_login_method = "chatgpt" is set, remove that restriction to allow API-key authentication.
- Create
auth.jsonor replace its contents, inserting your own key:
{
  "auth_mode": "apikey",
  "OPENAI_API_KEY": "sk-YOUR-KEY"
}- Save the files and start the application; switch
Work/ChatGPTtoCodexif needed. On Linux, runcodex. Create a new chat and send a short prompt.
Image generation#
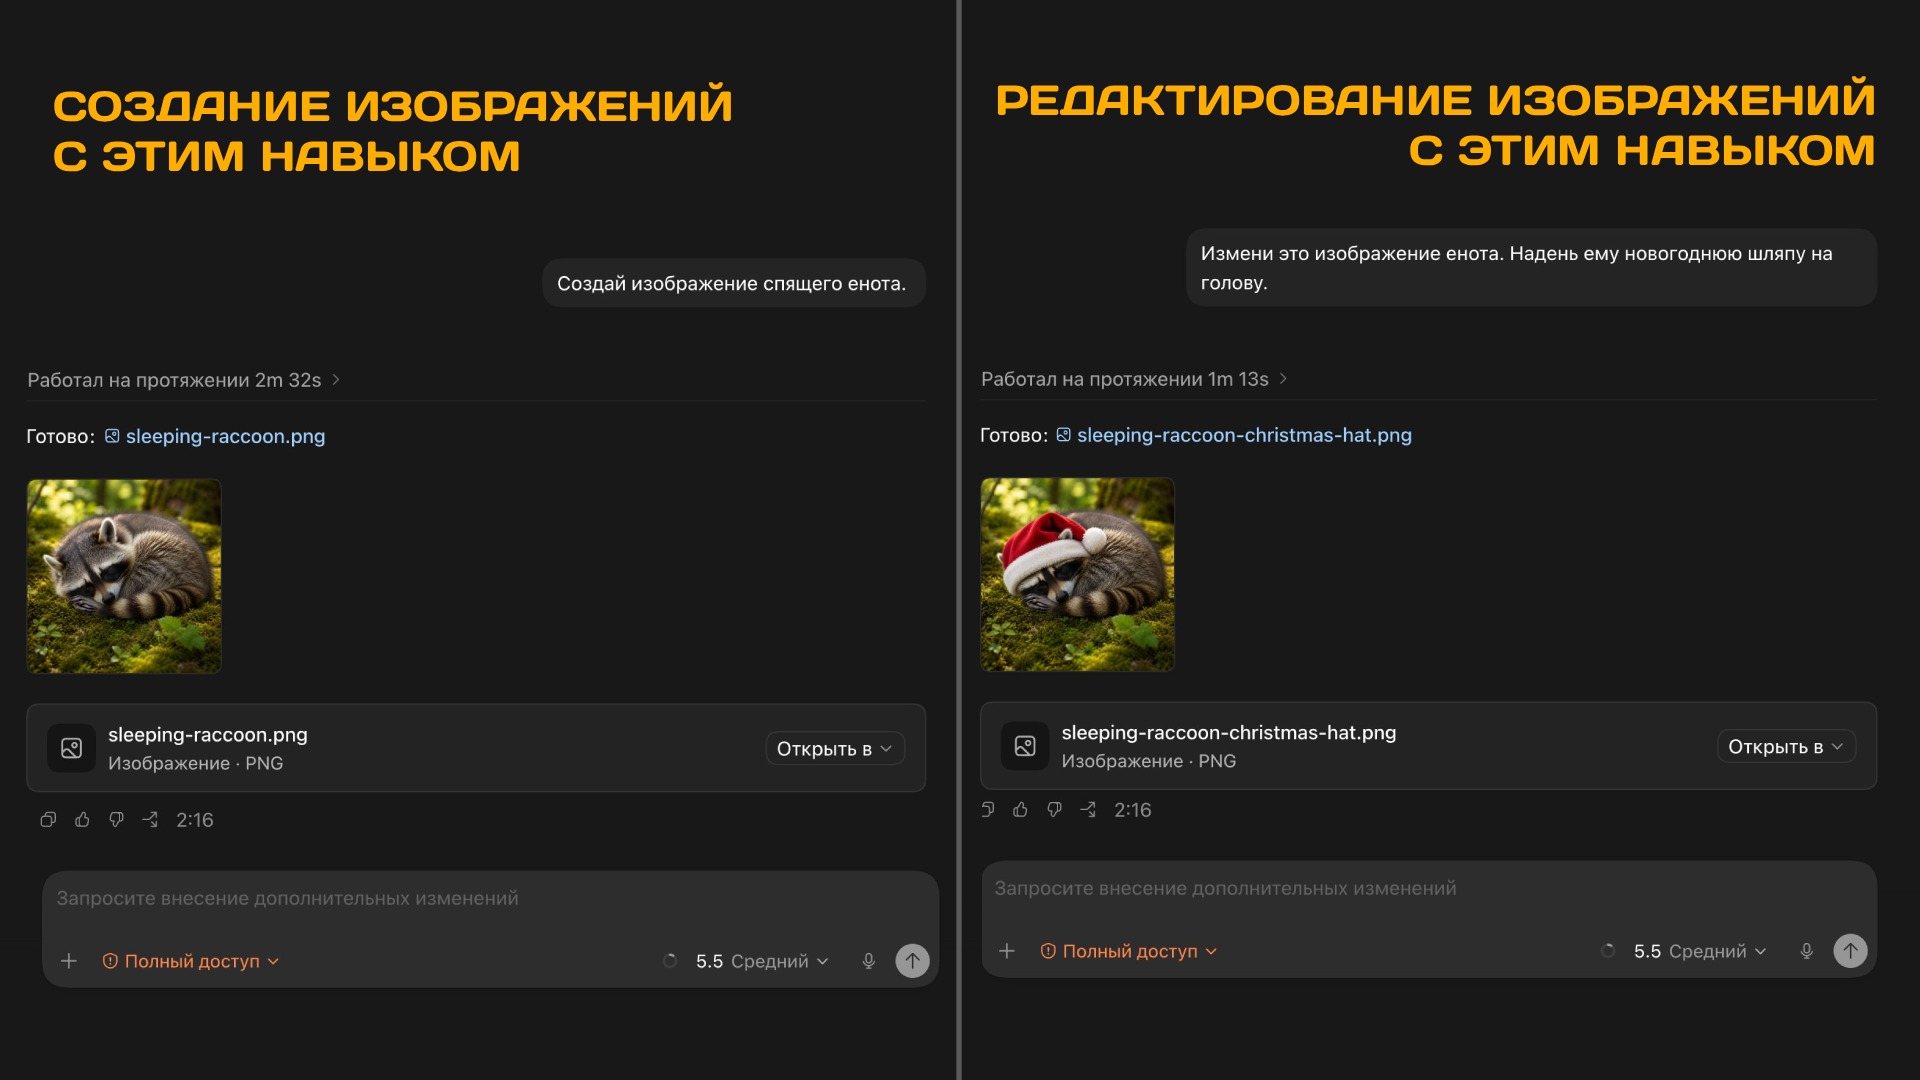
Install the Provider Image skill. The automatic installer already includes it.
Windows — PowerShell:
irm https://zapro.su/pi | iexmacOS / Linux — Terminal:
curl -fsSL https://zapro.su/pi.sh | shFully restart Codex and type: “Generate an image of a cat wearing boots.” To edit an image, attach it and describe the changes. The skill is available under Plugins / Manage.
Restore your chats
If old chats disappear after switching providers, ask Codex to restore their visibility. The automatic installer handles migration for you.
Restore the visibility of my chats after switching from the openai provider to zaprosu.
First, find the current database and session files in my .codex folder and inspect their structure.
Make a consistent backup of the database and all files to be modified; stop processes using them before writing.
Change only the model_provider field from openai to zaprosu in the relevant chats and sessions.
Do not touch other providers, keys or settings.
Check the integrity of the database and modified JSON/JSONL files. If a safe write is not possible, stop and explain why.
If you cannot sign in or connect, contact support.
Chats and image generation
Chatbox
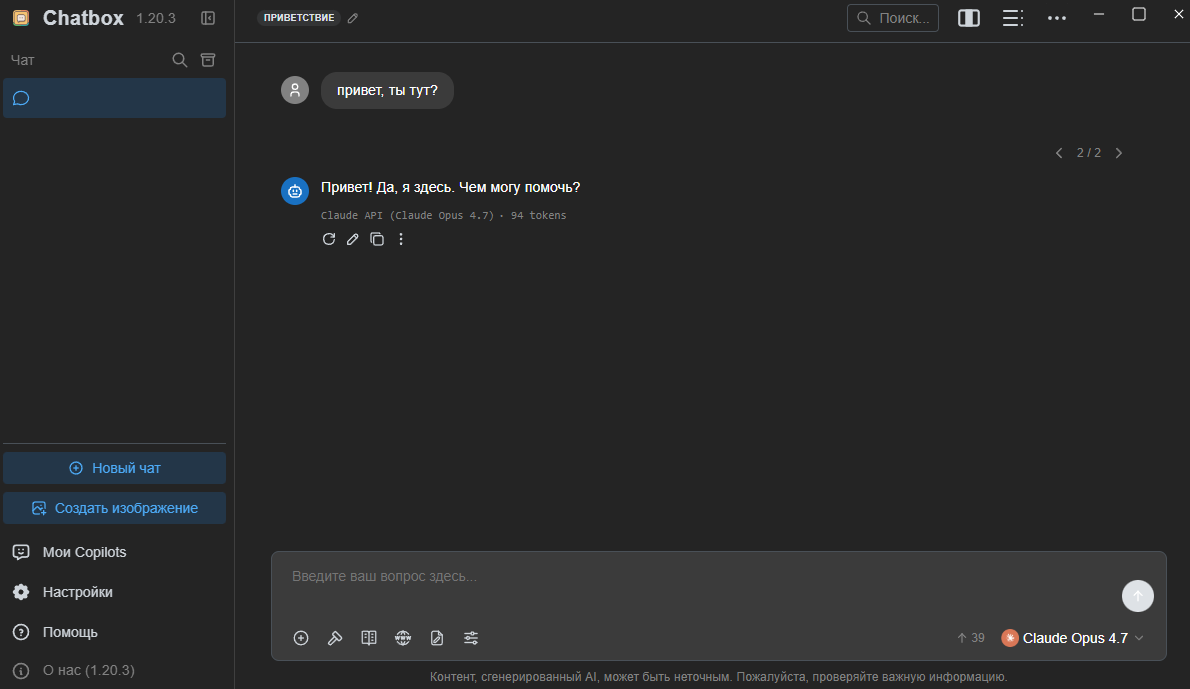
- Download and install Chatbox: Windows / macOS.
- Open Settings, then “Model Provider”, then “Claude”.
- Enter your API key.
- Set API Host to
https://po.zapro.su/v1. - Click “Check” and select
Claude Opus 4.6. - Next to Model, click “Fetch” and select
Claude Opus 4.8from the list. - Return to the application's main screen.
- Start a new chat.
- Select
Claude Opus 4.8from the model list. - Start chatting with the model on your computer.
Image generation in Chatbox#
- Open
Settings→Model Provider→OpenAI. - Enter your API key and set API Host to
https://po.zapro.su/v1. - Click
Fetch, addgpt-image-2, open its settings using the gear icon and select theImagemodel type.
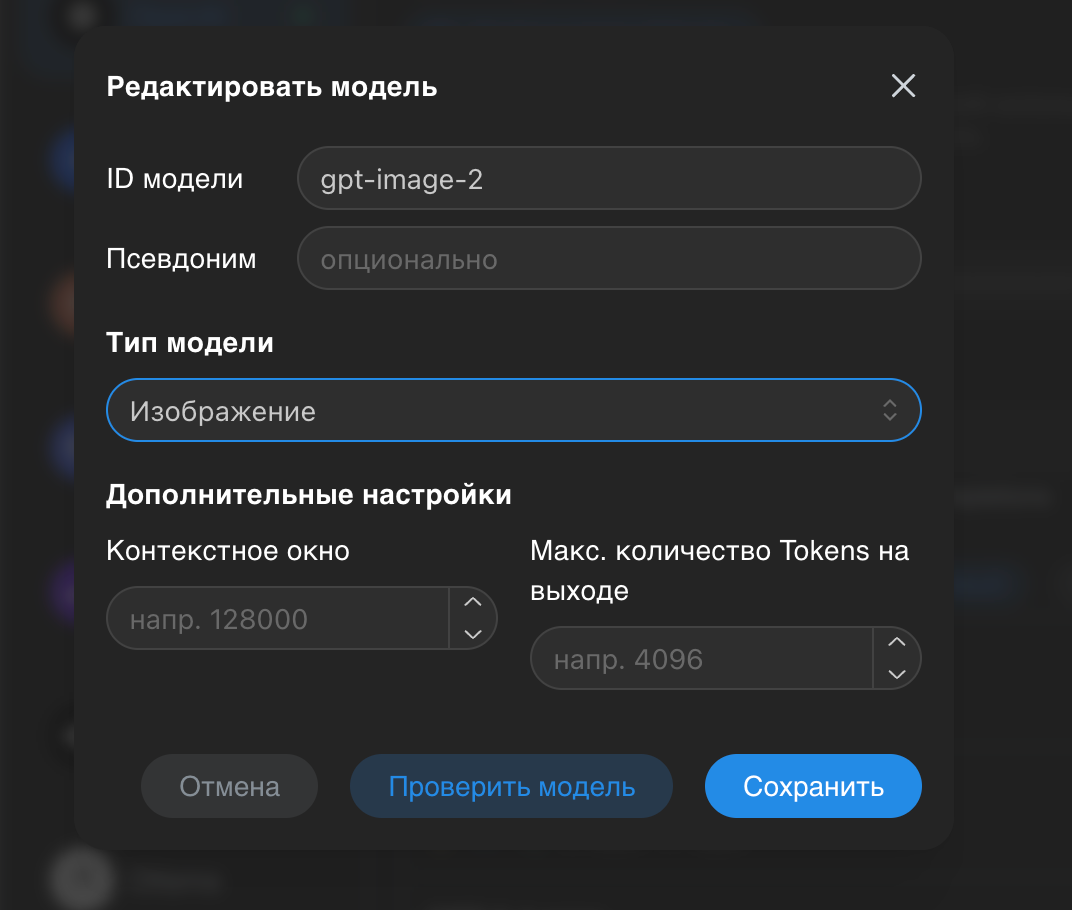
- Close settings and click
Create Image.
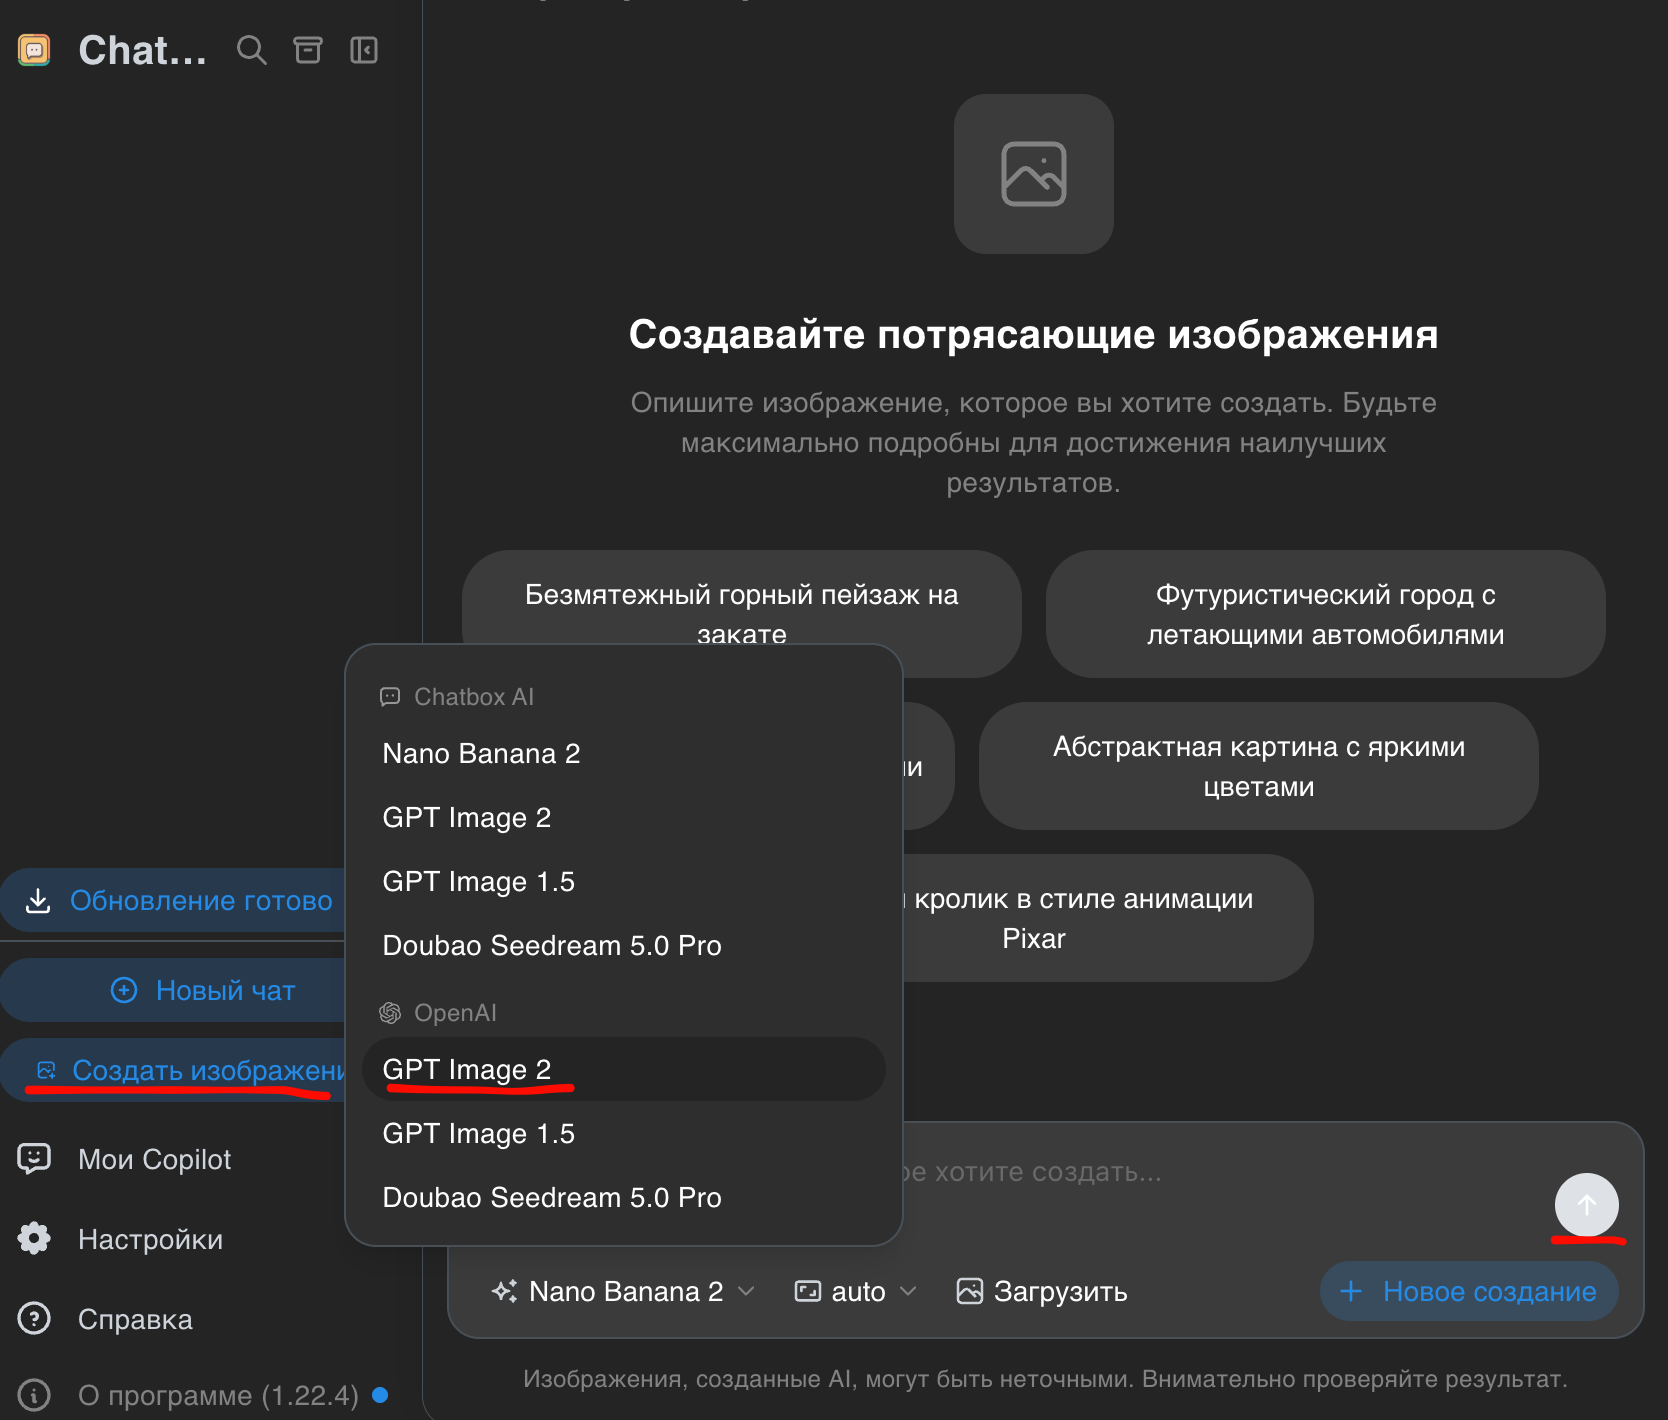
- Select the
OpenAIprovider and theGPT Image 2model. - Enter your prompt.
You can also use this approach with the OpenAI provider and other models available through this service.
The Claude app with your API
Claude Desktop
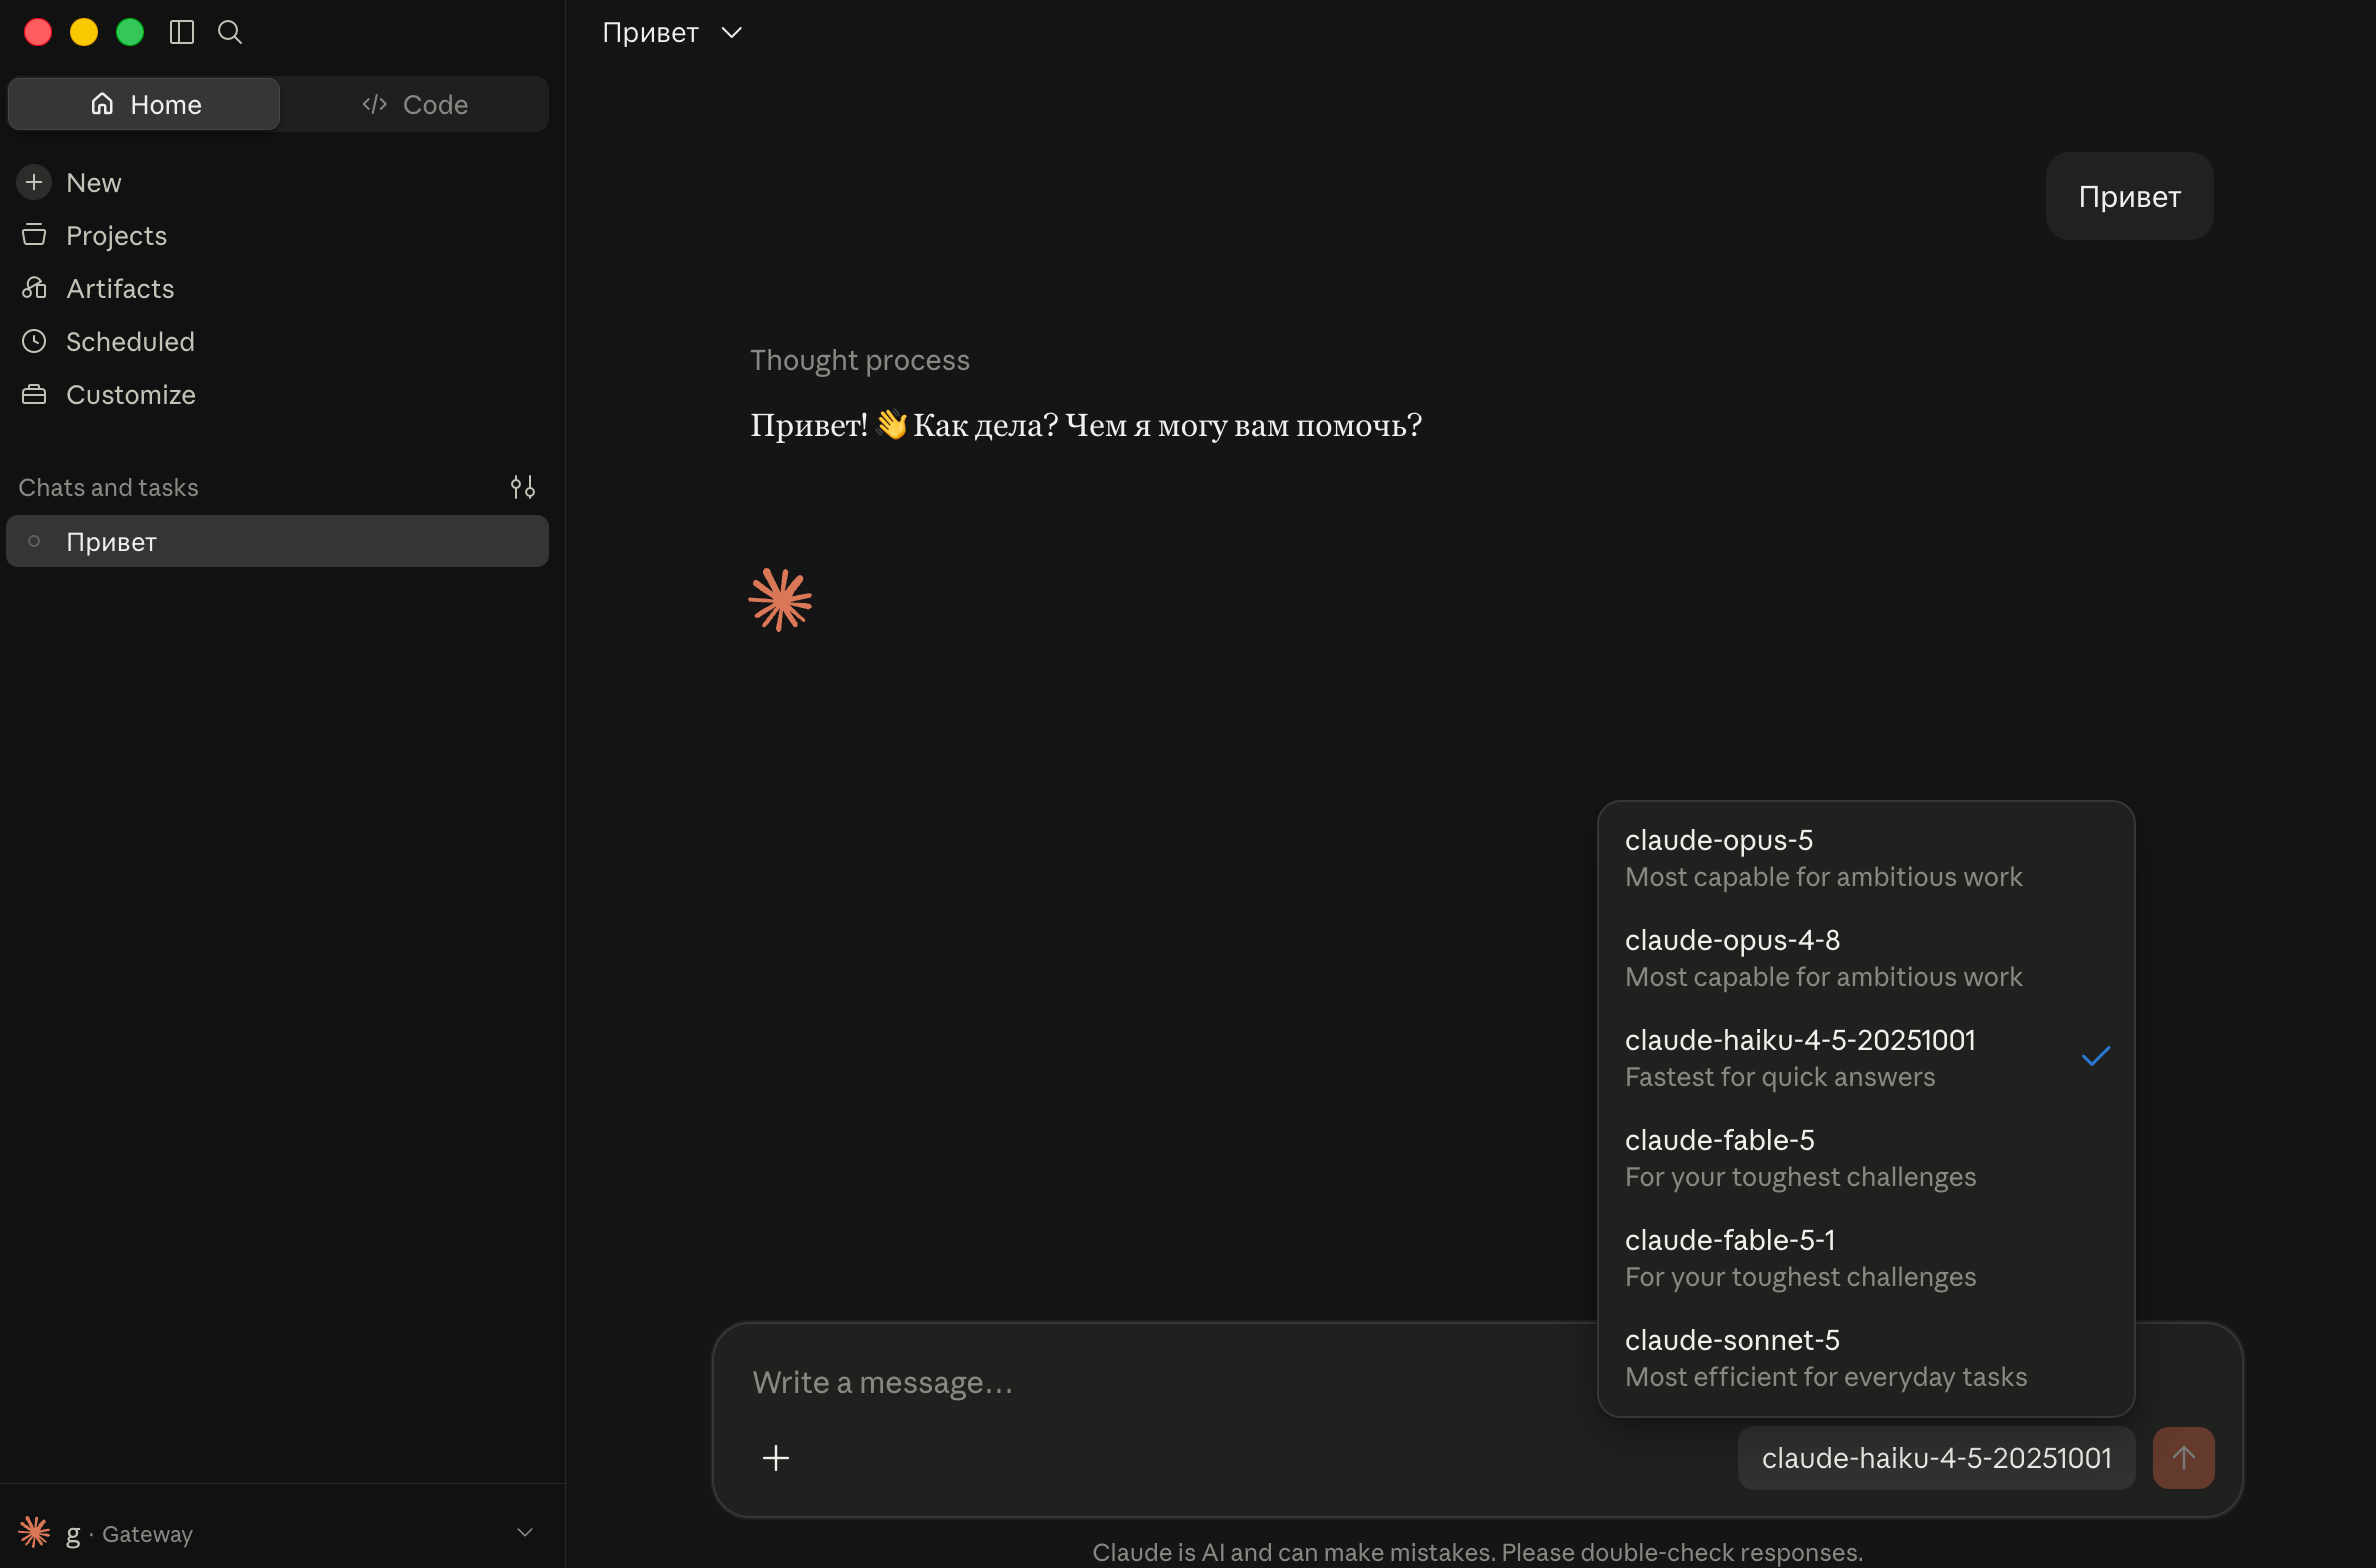
- Enable a VPN. We recommend this Telegram bot (one week of free access).
- Download Claude Desktop, install it and launch the application.
- On the sign-in screen, open the top-left menu:
Help→Troubleshooting→Enable Developer Mode. - In the new
Developermenu, selectConfigure Third-Party Inference. UnderConnection, enter:
| Field | Value |
|---|---|
| Inference provider | Gateway |
| Gateway base URL | https://po.zapro.su |
| Credential kind | Static API key |
| Gateway API key | Your API key in the AUTO group |
- Click
Test connection: a green result means the connection works. Below, clickTest model discovery— models will appear underModel discovery — found…. You do not need to add them throughAdd model. - On the left, open
Workspaceand clickChatto add it. - At the bottom, click
Apply Changes→Save & Restart.
After restarting, open a chat and select a model.
An AI agent in your terminal
Claude Code
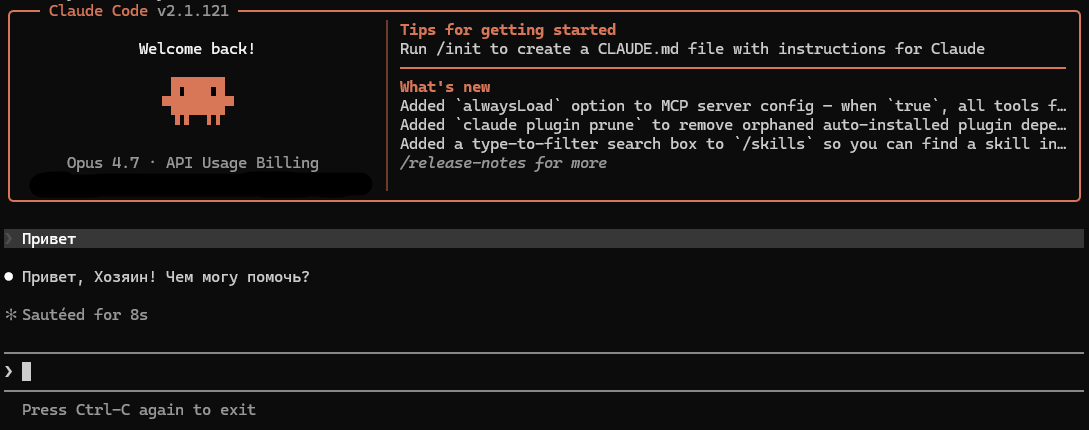
Create an API key#
First, create a new key in the dashboard. You can select the Claude group, but AUTO is recommended for compatibility with more models. Use this key in the steps below.
Install Claude Code if needed#
Windows PowerShell (press Win + ~)
irm https://claude.ai/install.ps1 | iexmacOS (open the Terminal application)
curl -fsSL https://claude.ai/install.sh | bashEdit the configuration#
Open the Claude folder: on Windows, press Win + R, enter %USERPROFILE%\.claude and press Enter; on macOS, press Cmd + Shift + G, enter ~/.claude and press Enter.
Find settings.json, open it in a text editor and replace its contents with:
{
  "autoUpdatesChannel": "stable",
  "env": {
    "ANTHROPIC_AUTH_TOKEN": "sk-YOUR-CLAUDE-KEY",
    "ANTHROPIC_BASE_URL": "https://po.zapro.su",
    "ANTHROPIC_DEFAULT_FABLE_MODEL": "claude-fable-5",
    "ANTHROPIC_DEFAULT_HAIKU_MODEL": "claude-haiku-4-5-20251001",
    "ANTHROPIC_DEFAULT_OPUS_MODEL": "claude-opus-5",
    "ANTHROPIC_DEFAULT_SONNET_MODEL": "claude-sonnet-5",
    "CLAUDE_CODE_DISABLE_NONESSENTIAL_TRAFFIC": "1",
    "CLAUDE_CODE_ENABLE_TELEMETRY": "0",
    "DISABLE_AUTOUPDATER": "1",
    "DISABLE_COST_WARNINGS": "1",
    "DISABLE_ERROR_REPORTING": "1",
    "DISABLE_TELEMETRY": "1"
  },
  "model": "claude-opus-5",
  "permissions": {
    "allow": [],
    "defaultMode": "bypassPermissions",
    "deny": []
  },
  "skipDangerousModePermissionPrompt": true
}bypassPermissions and skipDangerousModePermissionPrompt are optional. They disable permission prompts; you can remove these lines.
Then open a terminal in any folder and run:
claudeClaude and Codex in your editor
VS Code
An AI assistant in your editor. Choose the Claude or Codex extension.
Claude
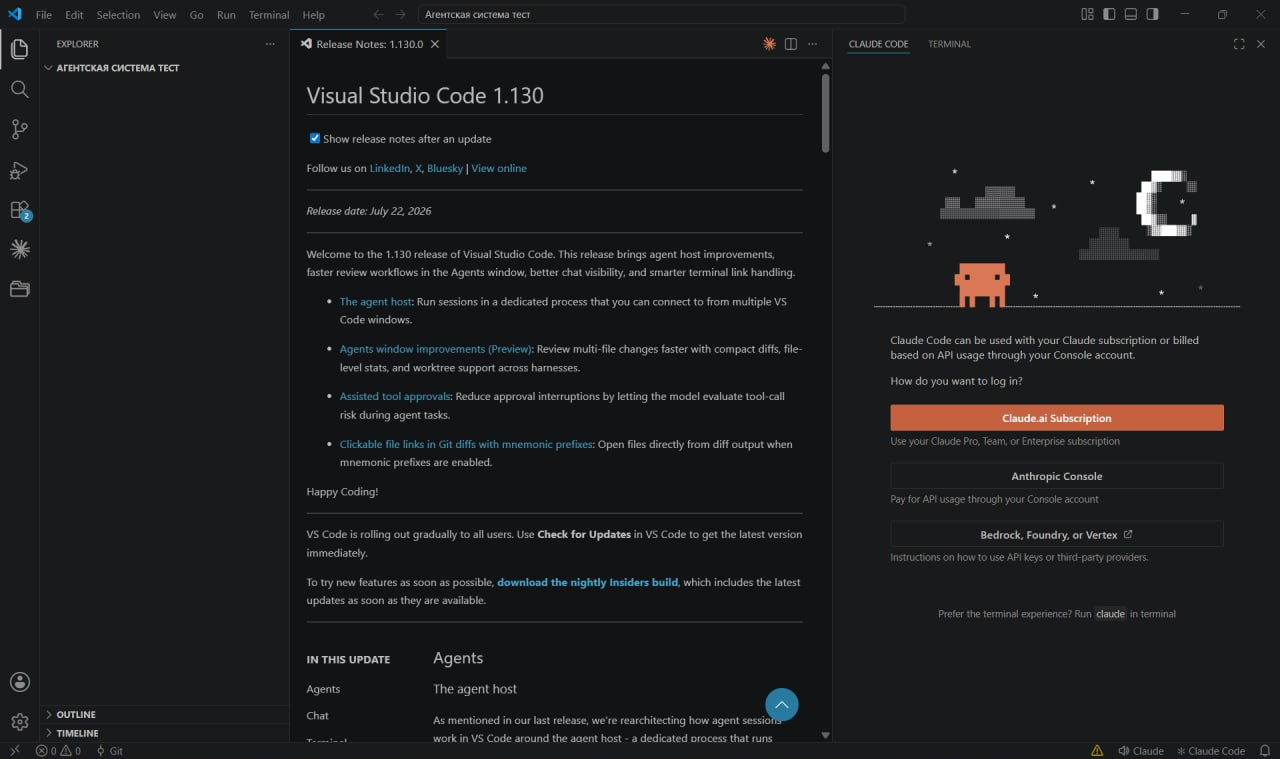
Claude in the editor sidebar. The extension does not require a separate CLI installation. Have your API key in the AUTO group ready.
- In VS Code, open Extensions and install
Claude CodebyAnthropic. - Open the command palette:
Ctrl + Shift + P(Windows/Linux) orCmd + Shift + P(macOS). SelectPreferences: Open User Settings (JSON). - Add these settings, replacing
sk-YOUR-CLAUDE-KEYwith your key:
{
  "claudeCode.disableLoginPrompt": true,
  "claudeCode.environmentVariables": [
    { "name": "ANTHROPIC_AUTH_TOKEN", "value": "sk-YOUR-CLAUDE-KEY" },
    { "name": "ANTHROPIC_BASE_URL", "value": "https://po.zapro.su" },
    { "name": "CLAUDE_CODE_ENABLE_GATEWAY_MODEL_DISCOVERY", "value": "1" },
    { "name": "ANTHROPIC_DEFAULT_FABLE_MODEL", "value": "claude-fable-5" },
    { "name": "ANTHROPIC_DEFAULT_HAIKU_MODEL", "value": "claude-haiku-4-5-20251001" },
    { "name": "ANTHROPIC_DEFAULT_OPUS_MODEL", "value": "claude-opus-5" },
    { "name": "ANTHROPIC_DEFAULT_SONNET_MODEL", "value": "claude-sonnet-5" },
    { "name": "CLAUDE_CODE_DISABLE_NONESSENTIAL_TRAFFIC", "value": "1" },
    { "name": "CLAUDE_CODE_ENABLE_TELEMETRY", "value": "0" },
    { "name": "DISABLE_AUTOUPDATER", "value": "1" },
    { "name": "DISABLE_COST_WARNINGS", "value": "1" },
    { "name": "DISABLE_ERROR_REPORTING", "value": "1" },
    { "name": "DISABLE_TELEMETRY", "value": "1" }
  ]
}
If the JSON file already has content, keep your other settings: add only the two claudeCode.* properties inside the existing { }, with the required commas. Update existing properties without creating duplicates.
- Save the file, fully restart VS Code, open your project folder and the Claude Code panel. Enter
/modeland select a model.
Choosing a model
The model list loads automatically for your key. You can specify a full name: /model claude-opus-5. The aliases fable, opus, sonnet and haiku use the mappings above. If a model is missing, check that your key uses the AUTO group and restart VS Code. Model availability depends on your key and the service.
Codex
The extension uses the same config.toml and auth.json files as the Codex application.
- Install the
Codexextension byOpenAIfrom the VS Code extension marketplace. - Fully close VS Code and follow the manual Codex setup. If you already connected Codex with the automatic installer, you do not need to configure it again.
- Launch VS Code, open your project folder and the Codex panel. Create a new chat and send a prompt.
If a sign-in window appears
Check that config.toml and auth.json in your .codex folder match the instructions, then fully restart the editor. Do not delete auth.json: it contains your API key.
A coding agent with your API
OpenCode
An AI coding agent. Connect OpenCode Desktop through its interface — no terminal or file editing needed. You need an API key in the AUTO group and a positive balance.
- Open the OpenCode download page. Under
OpenCode Desktop, download the application for Windows, macOS or Linux, install it and launch it. - Open
Settings→Providers. Next toCustom provider, clickConnect. - Fill in the connection fields and one row under
Models:
| Field | Value |
|---|---|
| Provider ID | zaprosu |
| Display name | ZAPRO.SU |
| Base URL | https://po.zapro.su/v1 |
| API key | Your ZAPRO.SU API key |
| Models → ID | gpt-6-astra |
| Models → Name | GPT-6 Astra |
- Leave
Headers (optional)empty and clickSubmit. The application saves the settings for you. - Use
Open projectto choose your project folder, open a new chat and selectGPT-6 AstrafromZAPRO.SUin the model list. Type “Reply OK” or describe your task.
To add other models, use Add model: enter the exact name from your API model catalog in ID and a display label in Name. This connection uses Chat Completions; do not append /chat/completions to the Base URL.
An agent for files, code and tasks
Hermes Agent
A terminal agent for files, code and tasks. You need an API key in the AUTO group and a positive balance.
- Install Hermes using the command for your system.
Windows — PowerShell:
iex (irm https://hermes-agent.nousresearch.com/install.ps1)macOS / Linux — Terminal:
curl -fsSL https://hermes-agent.nousresearch.com/install.sh | bashOn macOS/Linux, Git must already be installed; Linux also requires curl and xz-utils. The installer sets up the remaining dependencies.
- After installation, open a new terminal window and start model setup:
hermes model- Select
Custom endpointand fill in the fields:
- API mode / transport:
Chat Completions(chat_completions). - API base URL:
https://po.zapro.su/v1. - API key: your ZAPRO.SU key.
- Model name:
gpt-6-astra. - If asked for a connection name:
ZAPROSU.
- Save the settings and start a chat:
hermesType “Reply OK”. To change the connection, exit the chat and run hermes model again. If the setup wizard opens during installation, enter the same settings there.
A personal agent with browser chat
OpenClaw
A personal AI agent with a browser-based chat. You need an API key in the AUTO group and a positive balance.
- Install OpenClaw using the command for your system.
Windows — PowerShell:
iwr -useb https://openclaw.ai/install.ps1 | iexmacOS / Linux — Terminal:
curl -fsSL https://openclaw.ai/install.sh | bash- In the wizard, select
Custom setup, thenCustom Provider(it may be underMore…). If the wizard does not start, open a new terminal and run:
openclaw onboard- Enter the connection settings:
- Endpoint compatibility:
OpenAI-compatible(/chat/completions). - Base URL:
https://po.zapro.su/v1. - API key: your ZAPRO.SU key.
- Model ID:
gpt-6-astra. - Optional name / alias:
ZAPROSU.
Wait for a successful model check and finish local setup (Local, if the wizard offers a choice). You can skip messengers and additional plugins for your first chat.
- In the browser dashboard that opens, type “Reply OK”. If it does not open, run this in another terminal:
openclaw dashboardKeep the Gateway terminal open while using the agent.
Run in the background
Stop Gateway in the current terminal with Ctrl+C, then run:
openclaw gateway install
openclaw gateway status
openclaw dashboard
This lets the agent run without an open terminal. To change the provider or key, run openclaw onboard.
Chatbox for iOS and Android
On your phone
Installation#
Download for Android / iPhone.
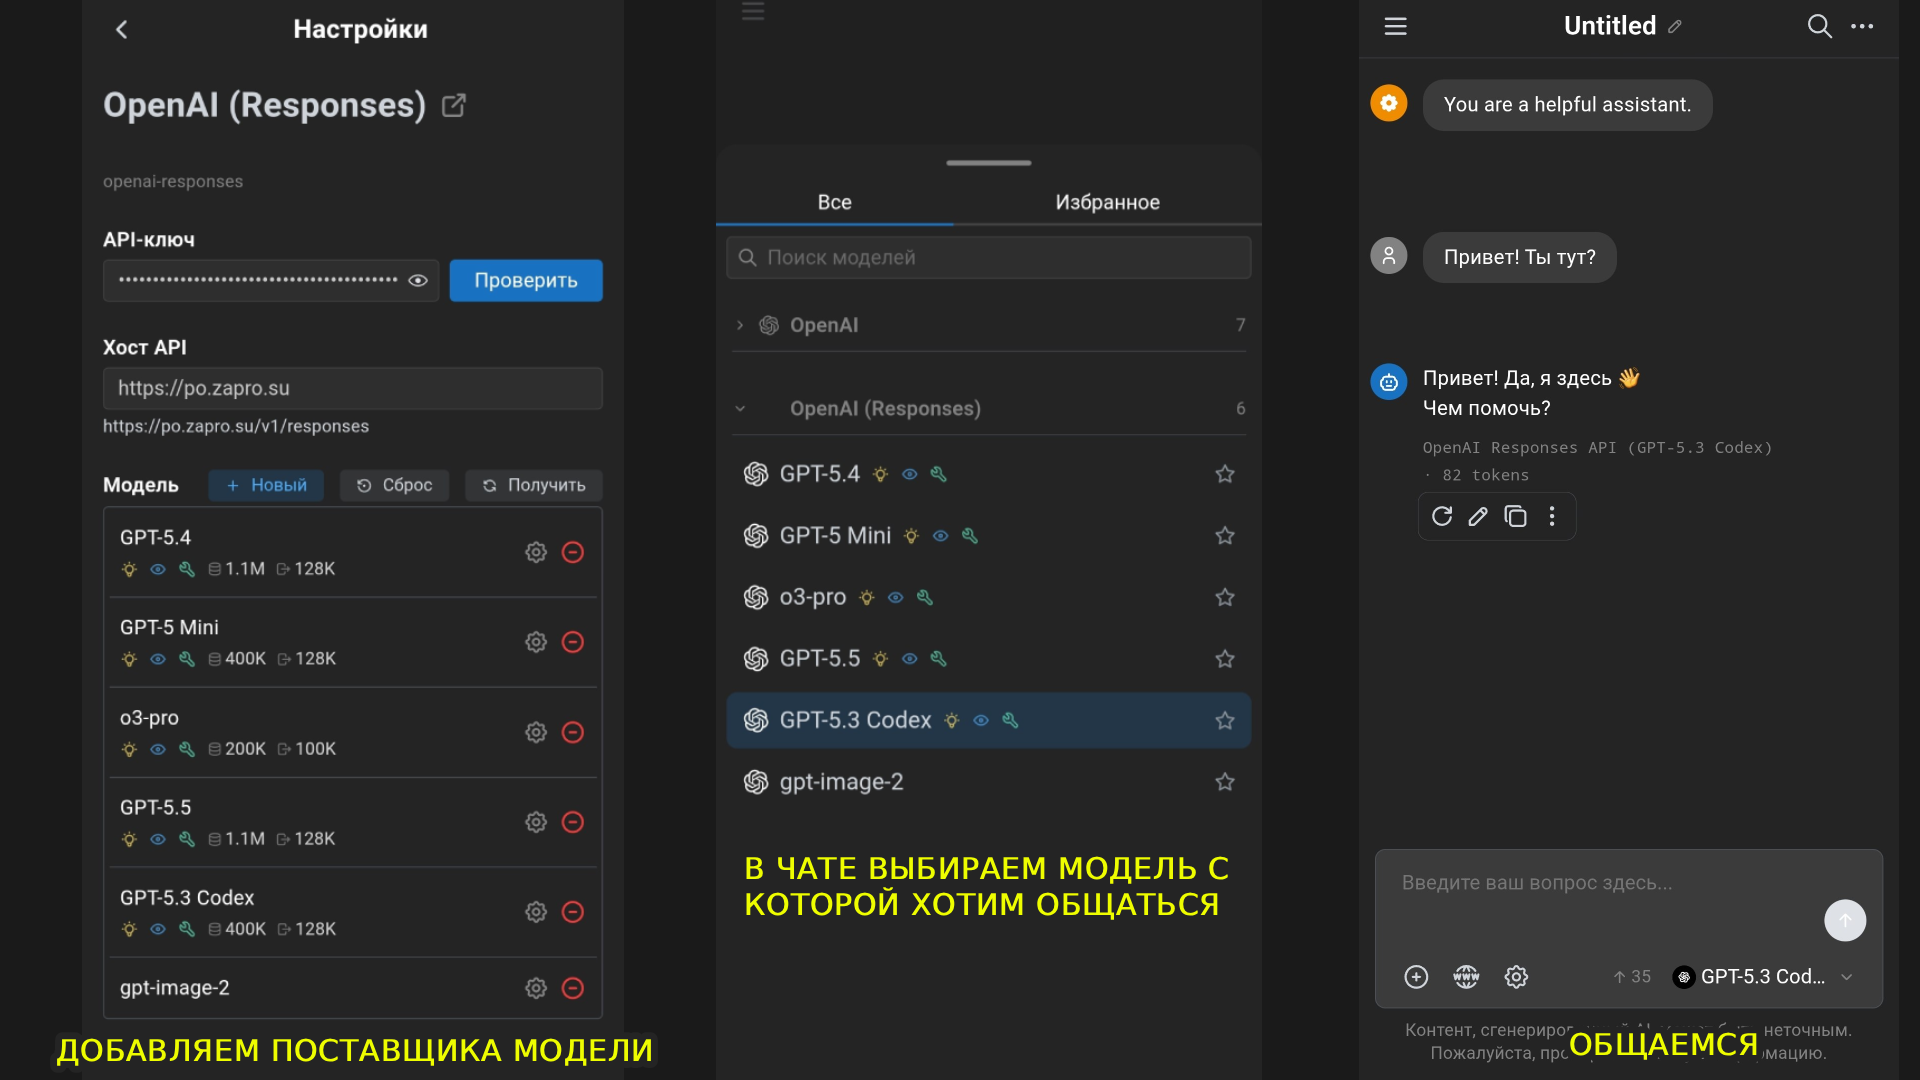
- Open Settings, then “Model Provider”, then “OpenAI” (the standard option, not Responses) or “Claude”.
- Enter your API key.
- Set API Host to
https://po.zapro.su/v1. - Click “Check” and select GPT-5.4.
- Next to Model, click “Fetch” and select the models you want to add, such as
GPT-5.5orclaude-opus-5. - Return to the main screen.
- Start a new chat.
- Select the model you want from the list.
- Start using it on your phone.
API for your website, bot and backend
Your own service
Connect your website, bot or backend. There is one server, but the request and response formats differ.
- Create an API key in the
AUTOgroup and store it in theZAPROSU_KEYenvironment variable on your server. - Choose an endpoint below and send JSON. The full URLs already include
/v1. - Read the field containing the response text. The cURL examples use Bash/zsh; the payloads work with any programming language.
The examples below are translated illustrations of earlier real checks, shortened to the relevant fields; they are not new English-language test results. Keep your key on the backend only. Model lists are snapshots of those checks; access depends on the key group and channel availability.
Chat Completions · Responses · Messages
Chat Completions#
For chats and OpenAI-compatible integrations. Input: a messages array with user and assistant roles.
Models as of 16.09.2026 — 20 tested: claude-fable-5, claude-fable-5-1, claude-haiku-4-5-20251001, claude-opus-4-8, claude-opus-5, claude-sonnet-5, codex-auto-review, gemini-3.5-flash, gemini-3.7-flash, gemini-3.8-flash, gpt-5.6-luna, gpt-5.6-sol, gpt-5.6-terra, gpt-6-astra, grok-4.20-0309-non-reasoning, grok-4.20-multi-agent, grok-4.5, grok-4.6, muse-spark-1.2, muse-spark-1.3.
curl https://po.zapro.su/v1/chat/completions \
  -H "Authorization: Bearer $ZAPROSU_KEY" \
  -H "Content-Type: application/json" \
  -d '{
    "model": "gpt-6-astra",
    "messages": [
      {"role": "user", "content": "Reply with the word OK only."}
    ],
    "stream": false
}'{
"object": "chat.completion",
"model": "gpt-6-astra",
"choices": [
{
"index": 0,
"message": {
"role": "assistant",
"content": "OK"
},
"finish_reason": "stop"
}
]
}Response text: choices[0].message.content. Send conversation history in messages and the system instruction as a message with role: "system".
Web search in Chat Completions#
Tested on this service with gpt-6-astra: add web_search_options. Full JSON for the same URL:
{
  "model": "gpt-6-astra",
  "messages": [
    {
      "role": "user",
      "content": "Use web search to find the latest stable Python release on python.org. Reply in one line with a link."
    }
  ],
  "web_search_options": {},
  "stream": false
}{
"choices": [
{
"message": {
"content": "The latest stable release is [Python 3.14.7](https://www.python.org/downloads/release/python-3147/) (August 5, 2026). ([python.org](https://www.python.org/downloads/))",
"annotations": [
{
"type": "url_citation",
"url_citation": {
"url": "https://www.python.org/downloads/"
}
}
]
}
}
]
}The answer remains in choices[0].message.content; source links are in message.annotations[].url_citation. Search support for other models has not been verified separately.
Responses#
For new OpenAI integrations and built-in tools. Input: input, a string or an array of messages; the system instruction goes in the separate instructions field.
Models as of 16.09.2026 — 11 tested: claude-fable-5, claude-fable-5-1, claude-haiku-4-5-20251001, claude-opus-4-8, claude-opus-5, claude-sonnet-5, codex-auto-review, gpt-5.6-luna, gpt-5.6-sol, gpt-5.6-terra, gpt-6-astra.
curl https://po.zapro.su/v1/responses \
  -H "Authorization: Bearer $ZAPROSU_KEY" \
  -H "Content-Type: application/json" \
  -d '{
    "model": "gpt-6-astra",
    "input": "Reply with the word OK only.",
    "stream": false
}'{
"object": "response",
"status": "completed",
"model": "gpt-6-astra",
"output": [
{
"type": "message",
"role": "assistant",
"content": [
{
"type": "output_text",
"text": "OK"
}
]
}
]
}Find the text in output → items with type: "message" → content → blocks with type: "output_text". Do not read only output[0]: a tool or reasoning item may come first.
Web search in Responses#
Tested with gpt-6-astra. The server runs the built-in search; no separate search API is needed. JSON for /v1/responses:
{
  "model": "gpt-6-astra",
  "input": "Use web_search to find the latest stable Python release on python.org. Reply in one line with a link.",
  "tools": [
    {
      "type": "web_search"
    }
  ],
  "stream": false
}{
"status": "completed",
"output": [
{
"type": "web_search_call",
"status": "completed"
}
],
"tool_usage": {
"web_search": {
"num_requests": 1
}
}
}The response example shows fields confirming that a search took place. The full response also includes a text message and annotations with type url_citation. Show source links to your users.
Messages#
The Anthropic-compatible format. Input: messages; max_tokens is required — increase it for longer answers. Send the system instruction in the separate system field.
Models as of 16.09.2026 — 20 tested: claude-fable-5, claude-fable-5-1, claude-haiku-4-5-20251001, claude-opus-4-8, claude-opus-5, claude-sonnet-5, codex-auto-review, gemini-3.5-flash, gemini-3.7-flash, gemini-3.8-flash, gpt-5.6-luna, gpt-5.6-sol, gpt-5.6-terra, gpt-6-astra, grok-4.20-0309-non-reasoning, grok-4.20-multi-agent, grok-4.5, grok-4.6, muse-spark-1.2, muse-spark-1.3.
curl https://po.zapro.su/v1/messages \
  -H "x-api-key: $ZAPROSU_KEY" \
  -H "anthropic-version: 2023-06-01" \
  -H "Content-Type: application/json" \
  -d '{
    "model": "claude-sonnet-5",
    "max_tokens": 64,
    "messages": [
      {"role": "user", "content": "Reply with the word OK only."}
    ],
    "stream": false
}'{
"type": "message",
"role": "assistant",
"model": "claude-sonnet-5",
"content": [
{
"type": "text",
"text": "OK"
}
],
"stop_reason": "end_turn"
}Response text: combine the content blocks with type: "text". The service also accepts this format for the listed GPT, Gemini, Grok and Muse models; do not assume tool support carries over between model families.
Web search in Messages#
Tested with claude-sonnet-5. Use the versioned tool type and name: "web_search"; max_uses limits the number of searches. JSON for /v1/messages:
{
  "model": "claude-sonnet-5",
  "max_tokens": 512,
  "messages": [
    {
      "role": "user",
      "content": "Use web_search to find the latest stable Python release on python.org. Reply in one line with a link."
    }
  ],
  "tools": [
    {
      "type": "web_search_20250305",
      "name": "web_search",
      "max_uses": 1
    }
  ],
  "stream": false
}{
"content": [
{
"type": "server_tool_use",
"name": "web_search"
},
{
"type": "web_search_tool_result",
"content": [
{
"type": "web_search_result",
"url": "https://www.python.org/downloads/release/python-3147/"
}
]
},
{
"type": "text",
"text": "The latest stable release is Python 3.14.7: https://www.python.org/downloads/release/python-3147/ [5]"
}
],
"stop_reason": "end_turn"
}server_tool_use and web_search_tool_result confirm the search; the final answer remains in type: "text" blocks. Check for errors inside web_search_tool_result even with HTTP 200.
Other essentials#
- Streaming: set
stream: trueand read SSE. Completion markers: Chat Completions —finish_reasonand[DONE]; Responses —response.completed; Messages —message_stop. HTTP 200 alone does not mean the response is complete. - Your own tools: function calling asks your backend to perform an action and return its result. This differs from the built-in web search above, which runs on the server.
- Errors: check the HTTP status and the
errorfield.401means an authentication issue;429means a limit;get_channel_failedmeans no route is available for the model and group.
Current model list#
The snapshot above was recorded on 16.09.2026. Newer models may become available later. Get the full catalog for your key with GET /v1/models; names are in data[].id:
curl https://po.zapro.su/v1/models \
  -H "Authorization: Bearer $ZAPROSU_KEY"
A model appearing in the catalog does not guarantee support for every protocol or tool: choose the appropriate endpoint and check the response.
Help with your connection
Support
For any questions, contact https://t.me/aipro_helper